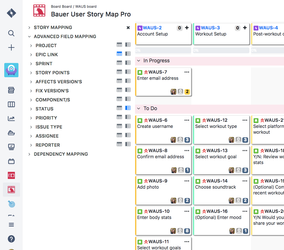
Understand and prioritize your user story. No matter how simple or complex the solution, Bauer Agile User Story Map Pro will let you organize and rearrange your stories and help you get the job done.


Install Agile User Story Map Pro

  1. Log into your Jira instance as an admin.
  2. Click the admin dropdown and select Add-ons. The “Find new add-ons” screen will begin loading.
  3. Find Bauer Agile User Story Map.
  4. Click “Free trial to download” and install the add-on.
  5. You’re all set! Close the “Installed and ready to go” dialog.
Access the Add-on in Jira

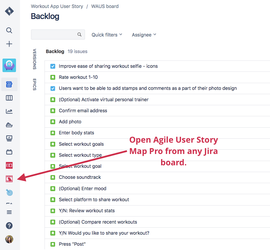
Access Bauer Agile User Story Map Pro add-on by opening your Jira board and clicking the User Story Map icon on the left-hand menu of Jira. Create a story map for each board you create in Jira.

Create Your First Story Map

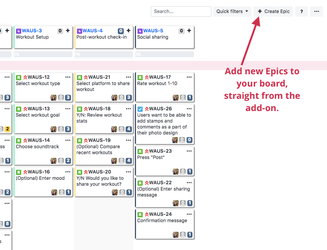
In Agile, the simplest way to create your first map is by adding epics to your board. If you have already set up issues and epics in your board, they will automatically appear in User Story Map add-on. If you are starting from scratch, or need to add additional epics, stories or other issue types, you can do it directly from the add-on, by clicking Create Epic.

Re-order your epics by dragging and dropping the associated card. All associated stories and issues will follow.


Build Out Your Story

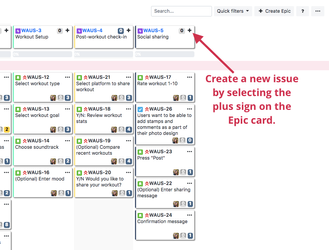
By adding stories to each epic, your user story will start to take shape. To add a new issue, select the plus sign on one of the Epic cards and select Story as the issue type when creating the new issue. Any issue type can be created in this way.

Reorder your stories according to the user journey, their order of importance, or other criteria. Just drag and drop your story and move it upwards or downwards. You can also drag a story to another epic’s column to change its location.

Understanding the Colors of Story Map

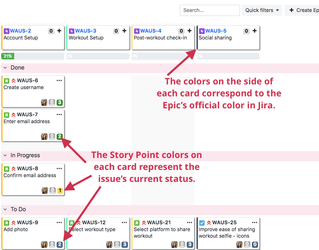
The colors on the left-hand side of each Epic and Issue card corresponds to the colors for that Epic in your Jira backlog.

On each issue card the number of story points is also highlighted in one of three colors: green, yellow and dark blue. These colors correspond to the issue’s status: done, in progress and to do, respectively.

Order Issues by Product Version or Sprint

The most common way to organize a story map is with the Epics arranged across the top of the map and issues arranged vertically according to versions or sprints.

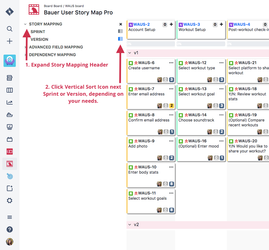
In Bauer User Story Map Pro, there are three organizational categories on the left-hand menu bar. Expand Story Mapping to access the Sprint and Version icons and click the Vertical Sort Icon next to either Sprint or Version to organize your story map accordingly.


Edit and Update Issues

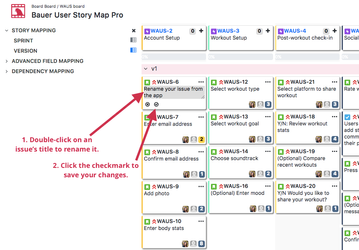
Each issue card can be renamed by just double-clicking the card title and typing in the new name. Once you’ve renamed it, confirm and save with the checkmark button.

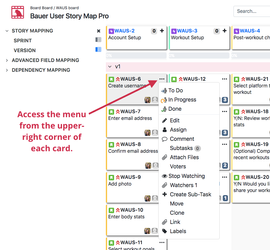
Issues can also be updated and edited using the card’s menu. Click to open the menu and explore your options. You can change the issue status, edit, comment on the issues, assign the issue to a team member, and execute other Jira edit actions from this menu.


Advanced Story Mapping

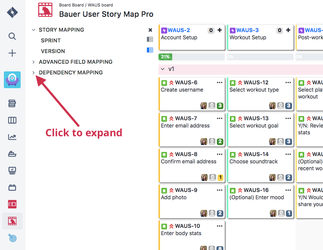
Expand the Advanced Field Mapping and Dependency Mapping menus on the left-hand menu bar of User Story Map Pro. You’ll see a wide variety of options that let you re-organize the story map according to your project management needs. You can use each characteristic as sorting criteria, horizontally or vertically.

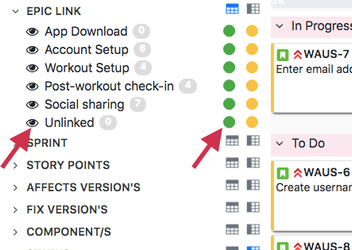
Expand those menu options even further to access show/hide (switch on and off using the eye icon) and color coding options (activate using green and yellow circles next to the relevant criteria). Use these functions to easily identify, highlight, or hide issues as your work demands.


See More of your Story Map

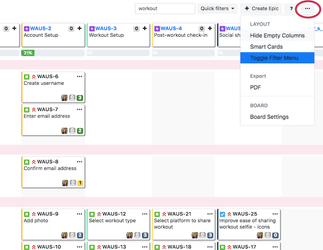
When you’re dealing with a larger story map, there are two tricks you can use to see more on your limited screen space. Toggle the filter menu by clicking the arrow icon, or going to the story map’s function menu and selecting “Toggle filter menu.”

From the same menu, you can also select “Smart cards,” and the cards will contract in size, leaving only the essentials in view. By using both of these tools, you can maximize the number of cards visible on the screen.


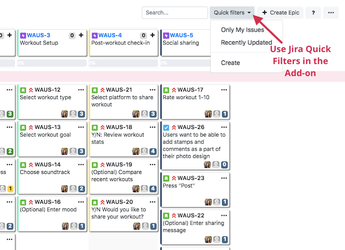
Use Jira’s Quick Filters  (Jira Cloud only)

Use Quick Filters that you already set up for your board in the add-on, too. Just click Quick Filters to access your pre-set filters or to add a new Quick Filter on the fly.


If you still have questions about setting up your user story map, please contact our support team.